Table of Contents
The below lists the organisers that are available in PACKMAN.
-
Organiser
- Patient
- Doctor
- Medical Institution
- Drug
- Pharmacist
- Patient Profile
-
Using these organisers, you can:
- Find and browse records
- Select single or multiple records
- Edit and delete single or multiple records
- Deactivate records
- Save sets of records for later use (i.e. selections)
Opening an Organiser
-
To open an Organiser:
- From the File menu, select Organisers, then choose the organiser you want to display
The below lists the things you can do with organiser records.
-
Action
- Sort
- Find
- Advanced Search
- Search With Wildcards
- Select
- Save Selections
- Add
- Edit
- Deactivate
Sorting Records
The columns in the organisers can be sorted into ascending or descending alphabetical order.
-
To sort by column:
- From the Options menu, select Sort.A list of the columns you can sort by is displayed.
- Choose the column you want to sort.

You can also sort records by selecting the column heading with the mouse. The mouse cursor changes to ![]() if you cannot sort by the column selected.
if you cannot sort by the column selected.
Successively selecting the same sort column heading toggles between ascending and descending order.
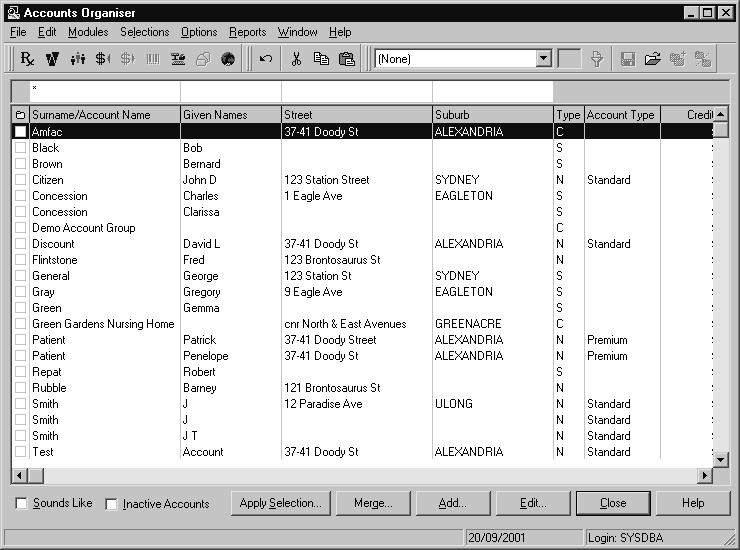
Finding Records
The organisers are designed to help you find the information you need quickly and accurately. To find a specific record, you can use the search row to quickly display records with specific characteristics (e.g. surname Brown.
given name Lucy).
For example:

You only have to enter the first part of the name or number in any of the columns in the search row. You do not have to type it in full.
-
Organisers with a lot of records (e.g. Patient Organiser), require you to type something in the search row before any records are displayed. You can then view the contents of the record list by:
- Clicking on the scroll arrows to move up or down.
- Pressing the Up Arrow or the Down Arrow on the keyboard.

You can find a record more quickly by using two or more boxes in the search row. Just type a few characters into each box.
Soundex
Soundex is a way of finding records according to the way theysound. If you can’t find a record using the method above, you can try using soundex. To find a record using soundex, you must first select the Sounds Like check box. Then spell out what you are looking for the way it sounds.
Advanced Search
The advanced search feature is useful for tracking down hard to find records. However, it is much slower than using the normal and soundex search techniques.
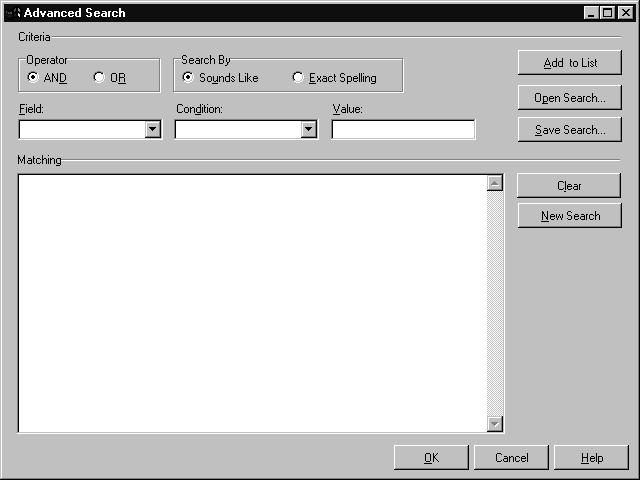
Specifying Search Criteria
-
To set up your search criteria:
- From the organiser choose Advanced Search.The Advanced Search screen is displayed
- Select the name of the field you want to search from the Field box.
- Select the type of comparison you are going to make on this field from the Condition box.You can choose from equal to, not equal to, less than, greater than, less than or equal to, greater than or equal to.
- Type the data that you are looking for into the Value box.
- Under Search By, select either Exact Spelling or Sounds LikeThe Search By selection only applies to the equal to and not equal to conditions.
- Choose Add to List.The completed criterion is displayed in the Matching box.
- To add another search criterion, follow steps 2 to 6 then under the Operator heading, select AND or OR according to how this criterion relates to the previous one
- Once you have set up your criteria, choose OK to start the search.
The value can include wildcard characters. A wildcard is where you replace letters in the word with an asterisk (*) if you are unsure how the word is spelt.
If you change your mind and want to start over, choose Clear. Choose Cancel to return to the organiser without searching.
You can use several criteria for an advanced search. Follow steps 1 to 5 above until all criteria are set, then select AND or OR to indicate how they are related.
Saving Search Criteria
-
To save your search criteria for later use:
- Specify your search criteria (i.e. follow steps 1 to 7 above
- Choose Save Search.The Save Search screen is displayed
- Type a name for the search criteria into the File name box
- 4 Choose OK.If a file already exists with the selected name, you are asked if you want to replace it with the new criteria
Loading Search Criteria
-
To load saved advanced search criteria:
- From the Advanced Search screen choose Open Search.The Open Search screen is displayed.
- Select the name of the criteria you want.
- Choose OK.The loaded criteria are displayed on the Advanced Search
screen
Search With Wildcards
-
Wildcards are special characters that match any characters in text comparisons.
- An asterisk (*) matches any number of characters.
- A question mark (?) matches any single character.
For example:
- m*n matches (among other things) man, men, moon, motion, mountain, etc.
- m?n matches man and men, but none of the other words in the previous example.
Use wildcards when searching for text that is in the middle of data, or when you want to find a particular pattern of characters.
For example:
Organiser
Selecting Records
-
You can select:
- A single record
- Multiple records
- All records
- An inversion of the selected records
Single Records
-
To select a single record for immediate use (e.g. to edit it):
- Click on the record, or use the Up Arrow and the Down Arrows on the keyboard to highlight the record.
Multiple Records
-
To select multiple adjacent records:
- Select the first record you require
- 2 Press and hold Shift, then either click on the last record you require or use the Up Arrow and the Down Arrows to extend the selection to the last record required.
- Release Shift.
-
To select multiple separate records press and hold Ctrl, then either:
- Click on each record you require.
- Use the Up Arrow and the Down Arrows to move through the records and the spacebar to select the record.Release Ctrl when all the records are selected.
Each time a record is selected, it toggles between being selected and not being selected.
To clear the current selection, choose Select None from the Selections menu.
All Records
-
To select all the records shown in the record list:
- From the Selections menu, choose Select All.
Inverting Selected Records
-
To invert the current selection:
- From the Selections menu, choose Invert.
For example:
Saving Selections #
A selection is a group of records that you can save for later use. For example, you may want to run a series of reports over time using a particular set of records.
-
This section describes how to:
- Create a selection
- Rename a selection
- Delete records from a selection
- Use a selection
Creating Selections
-
To make a new selection:
- Select the records that you want in the selection
- From the Selections menu, choose Save
- Type a name for the selection into the Selection Name box.
- Choose OK.
Renaming a Selection
- From the Selections menu, choose Save As.The Selections screen is displayed.
- Select the selection from the Selections List.
- Type the new name in the Selection Name box
- Choose OK.
If a selection already exists with that name, you are asked if you want to replace it with the new selection.
Deleting Records from a Selection
-
To delete records from a selection:
- Load one of the selections by choosing Load from the Selections menu.
- Select the records you want to delete from your selection and press Del.
- From the Selections menu, choose Save As.
- Type the same name of the selection in the Selection Name box
- Choose OK.
- You are asked if you want to replace it with the new selection.
- Choose OK.
Using Selections
-
Some uses for selections are:
- Christmas card list
- UFS members
- Baby club members.
-
To load a saved selection:
- From the Selections menu, choose Load.The Selections screen is displayed.
- Select the selection you want to load.
- Choose OK.
Adding Records
-
To add a new record to the organiser:
- From the organiser, choose Add.A blank details screen is displayed.
- Enter the new record’s information.
- Choose OK.
Editing Records
-
To edit the details of a record
- Select the required record in the organiser, then choose Edit.The details screen is displayed
- Make the required changes
- Choose OK.
You can also double-click on the required record to display the details screen.
Multiple Edit
-
To apply the same editing actions to multiple records:
- Select the records in the organiser, then choose Edit All.A details screen with a composite of the selected records is displayed. A grey box means that the information is different across the records.
- Make the changes you require.
- Choose OK.Any changes made are applied to all records
-
To edit multiple records singularly:
- Select the records in the organiser, then choose Edit.The details screen displays the first record selected.
- Make your changes, then choose Save.
- Press
 to move to the next record.The details screen is updated to show the next record
 - Repeat steps 2 and 3 until all changes are made.
- Choose OK.
Deactivating Records
Records that are no longer used in the system can be deactivated so that they are no longer available from the PACKMAN work area.
-
To deactivate a record
- Select the record.
- Choose Deactivate.
You can also deactivate a series of records using the multiple edit feature .Deactivated records remain in the system for reporting purposes and can be accessed from the organiser but are no longer available from the work area.


