Table of Contents
Setting up an Institution #
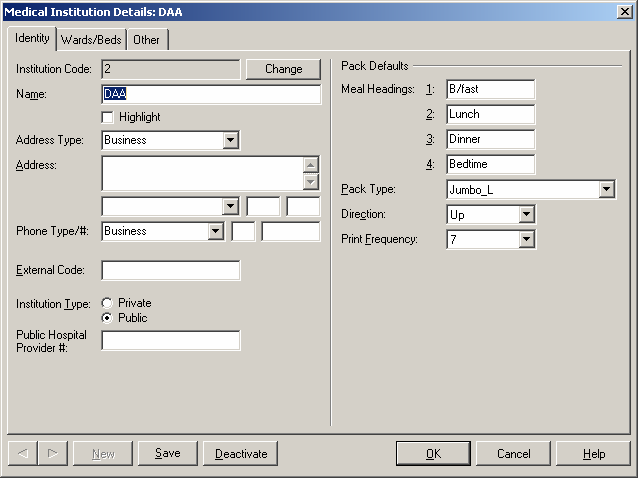
You need to set up a special institution to group and track all your DAA patients. Head office wants you to call it “DAA”.
From the main screen select “File” “Organisers” “Medical Institutions” then click “Add” and fill in the details as listed below. Then click “OK” to save.
Patients #
Type Surname first eg Taylor or Taylor, I
This will list only patients with profiles already set up so if you want to add a patient from LOTS click the “Add” button and all the LOTS patients will be listed. (This may take a few seconds to link to LOTS).
You can then select the required patient and they will be added as a Packman patient.
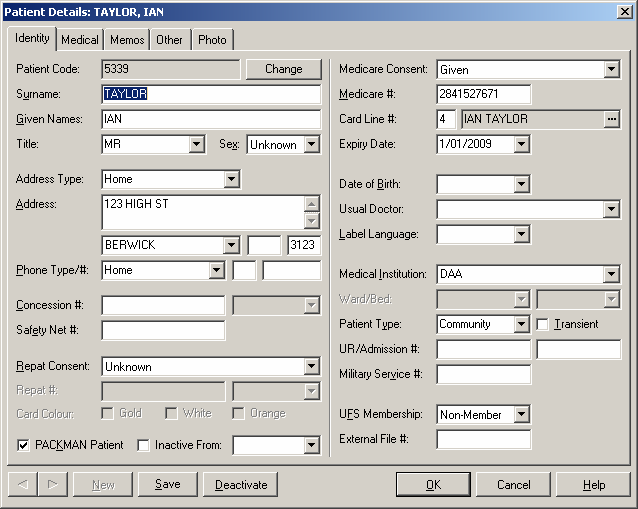
Click on the “details” button at the top RHS of the screen and the patient details are listed. Add the “Medical institution” DAA (or other institution) and note that the patient is ticked as a Packman patient. Click OK.
Preparing Foils #
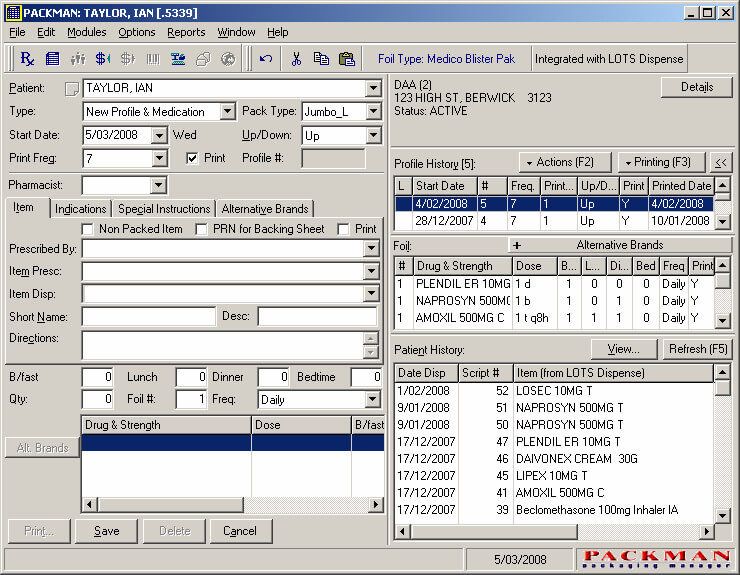
Everything is done on the one screen: The profile history and dispensing history are on the right of the screen and new profiles are created on the left side. Below the institution and the address on the RHS are 3 main areas.
- The first lists the completed profiles “Profile History”– in this case, the highlighted one dated 4/02/2008.
- The next lists all the medications contained in that profile, Plendil, Naprosyn, Amoxil, etc.
- The next lists all the patients dispensing history
1 Creating a new Profile #
Add your Pharmacist initials and then Double click on the item you want from the patient history box on bottom right hand side of the screen, in this case Amoxil.
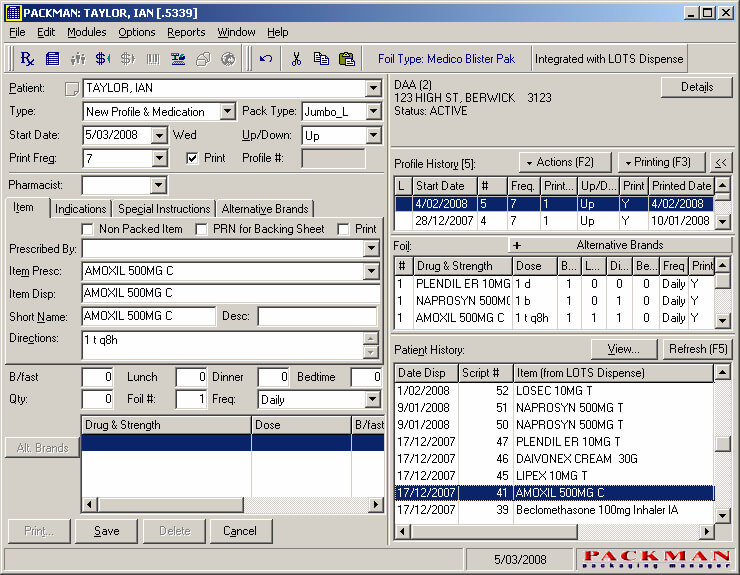
You need to “Tab” through each dosage time and add the directions keep using “Tab” until Amoxil is added to the bottom field on the LHS of the screen.
You can then Double click on the next drug you want to add to the profile and tab through until the drug is added to bottom field. When all the drugs are added then click “Save”and the new profile will be added to the list of “Profiles Historys”
2 Changing a Profile #
All changes to that patients profile can be done from “Actions F2” . For example click on “Edit Profile” and you will see the screen in “EDITING” mode. From here you can change the start date, dosage and frequency etc.
- Single Click on the relevant profile you want to change
- Then click on “Actions F2” and your choice of actions will be shown.
- Edit Profile, Add medication to profile, Delete profile etc see list
- To Edit a profile highlight (single click) the profile you want and highlight the drug you want to edit then click on “Actions F2” and the drug will be brought up for you to edit the dose etc
- To Add a medication to a profile,
- Highlight the profile and select “Add a medication” from “Actions F2” and you can enter pharmacist initials and double-click on the drug you wish to add etc.
- To Remove a single medication from the profile
- Highlight the profile and click on the medication to be removed. If you click on “Actions F2” select the option “Delete selected medication from foil”
Printing Foils #
1 Printing Individual Foils #
Individual Foils printing can be done by clicking “Printing F3”, then select “Print Selected Profile”.
Start date would be the starting date of the Foil.
Foil date would be the date the Foil is printed.
If you select alternating days for a particular medication, you could select which week you are on by choosing “First Alternating Days” or “Second Alternating Days”.
Click on “Print” when you are ready to print the foil
2 Batch Print #
If you are printing a set of Foils for a Nursing Home every week, printing Foils individually can be ineffective. This is where Batch Print comes in. Batch Print allows you to print all Foils for a particular group in one go.
To do this, click on Reports, then Batch Print.
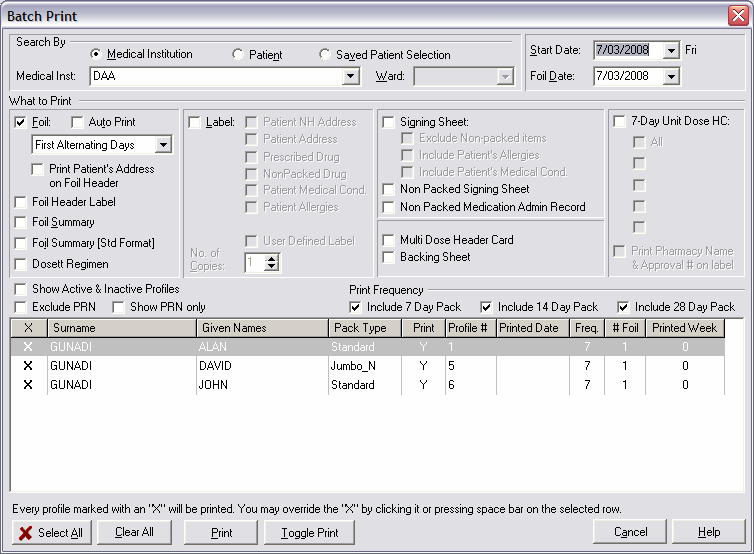
- On the “Medical Inst” box, you can select the Medical Institution you wanted to print.
- On “Start Date”, select the starting date of the Foil.
- On “Foil Date”, select the date the Foil is printed. Make sure the “Foil” box is ticked.
- If this is not ticked, no foil will be printed.
- If you wish to exclude a certain foil from printing, remove the “X” icon from the foil.
- Click on “Print” to start printing the Foils.
Reports #
1 Patient List #
This report will give you the list of all patients in DAA group.
- Click on “Reports”
- Click on “Patient List”
- Type “DAA” on the Medical Institution Field and press Enter
- Click on “Preview”
- Click on the print icon on the top to print the report.

2 Current Patient Profile Listing #
This report will give you the list of all foils for patients in DAA group.
- Click on “Reports”
- Click on “Current Patient Profile Listing”
- Type “DAA” on the Medical Institution Field and press Enter
- Click on “Print”, and select “Print All Patients”.
- Click on the print icon on the top to print the report.


