Each organiser record has a corresponding details screen which displays all the information about a record. Most details screens have multiple tabbed pages with the first page containing the most frequently used information.
To open a details screen from an organiser, either:
- Choose Add
- Select a record then choose Edit.
You can also open details screens from the work area and from other details screens.
For example:
To open the Patient Details screen from the work area, select the down arrow in the Patient box, then choose Add.
Parts of the Details Screens #
Details screens have the following parts:
- Title Bar
- Tabbed Pages
- Command Buttons
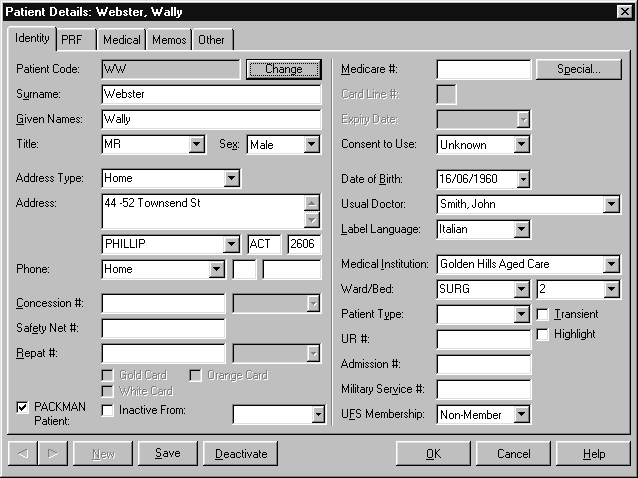
Title Bar #
The title bar is the horizontal bar at the top of the details screen. It has:
- The identity of the record you are working on
- A close button.
Tabs #
Each details screen has one or more tabbed pages. The first tab shows the most frequently used information, while subsequent pages show other related information.
Unique Identifying Code
The Code box always appears at the top of the first tabbed page. It uniquely identifies the record you are viewing. This code is initially generated by Amfac, but can be changed to something easy to remember for frequently used records.

When data is converted from another system, the identifiers from that system are retained if possible and automatically set up as Amfac identifying codes.
The identifying code is the fastest way to select a record.
To select a record using the identifying code, type a full stop followed by the code.
For example, if you have assigned the code SMJ to John Smith:
To select the patient using this code, in the Patient box, type .smj then press Tab.
To change the identifying code for a record:
- Select the first tab in the details screen.
- Choose Change.
The Code box changes from grey to white. - Type your identifier into the Code box.
You can use letters and numbers, but no spaces. - Choose Save.
If the identifier already exists for another record of the same type, an error message is displayed. Choose OK then enter another identifier.
Command Buttons #
Details screens have two types of command buttons:
- Record command buttons
- Screen command buttons.
If a command button has a black border all around it, it is the default command button for the screen. Press Enter to choose a default command button.
![]()
For details screens, the default command button is OK.
Record Command Buttons
The record command buttons are at the bottom left of the details screen. Use these to manage records without closing the details screen.
The table below lists the record command buttons in the details screens and describes their use. Previous, and Next are only available when several records have been selected.
| Previous |
Choose Previous to display the record that precedes the current record. |
|---|---|
| Next |
Choose Next to display the record that follows the current record. |
| New | Choose New to display a blank details screen. You can then enter the details for a new record. |
| Save | Choose Save to save any changes made to the current record. |
| Deactivate | Choose Deactivate to flag a record so that it cannot be modified or used for new transactions. Details are retained for reporting and auditing purposes. The record can be reactivated through the organiser if necessary |

Use Save as you go when making complex changes. That way if you make a mistake you can use Cancel to discard just the most recent changes, rather than losing them all.
Screen Command Buttons
The screen command buttons are at the bottom right of the details screen. Use these to control the display of the details screen.
The table below lists the screen command buttons and describes their use.
| OK | Choose OK to save any changes made to the current record and close the details screen. |
|---|---|
| Cancel | Choose Cancel to discard all unsaved changes made to the current record and close the details screen. |
| Help | Choose Help to display online help information regarding the details screen you are using. |

Cancel discards unsaved changes to all pages on the details screen, not just the current page. Use the Save button to save changes as you go, to avoid unwanted loss of information.
Change Confirmation #
If you choose Previous, Next, New or Cancel before saving your changes, all Amfac modules prompt you to save current changes.
- Choose Yes to save the changes.
- Choose No to discard the changes.
- Choose Cancel to return to the current record.


