
You can add or configure the following settings for Stores to manage general details, privacy settings, transfer schedules and staff details.
IMPORTANT
The Store Name is used to validate the Registry key. If you wish to edit a Store’s Name, you will need to re-register the Store with Corum Support (1300 760 022). Failing to do so will cease data transmissions.
Adding or Modifying Store Details
The Store Details tab lets you define the general details of the Store such as Store ID, Store name, Zone allocation and Store contacts.
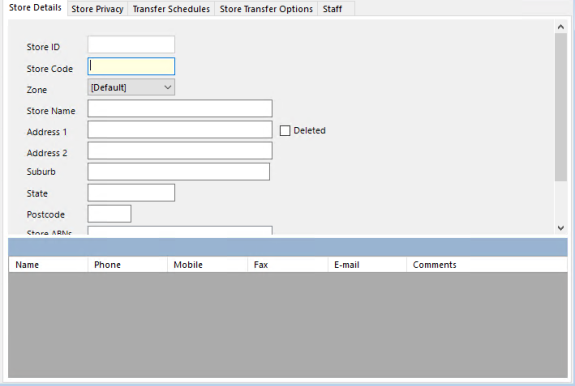
To add or modify the Store details:
- In the RPM menu, click Stores and then click Store Management.The Store Management screen is displayed.
- Select Add Store.
- Enter the general details such as Unique Store Code, Zone, Store Name and Store Address information.
- Select Save Changes to save the Store information.The Store will be added under the Store List.
- To add Australia Business Number (ABN), select the Store.
- On the Store Details tab, right-click on Store ABNs and select Add New ABN.
- On the Add New ABN dialogue, enter ABN and then select OK.
- On the Confirmation message, select OK.
- To add the contact person for the Store, right-click on the Name column and select Add New Contact.The Add/Edit Contact dialogue is displayed.
- Enter the general details such as Name, Phone Number, Email and so on.
- Select Save to save the contact details.
The Store and contact details are saved, and you can move on to the Store Privacy tab.
Adding Store Privacy Details
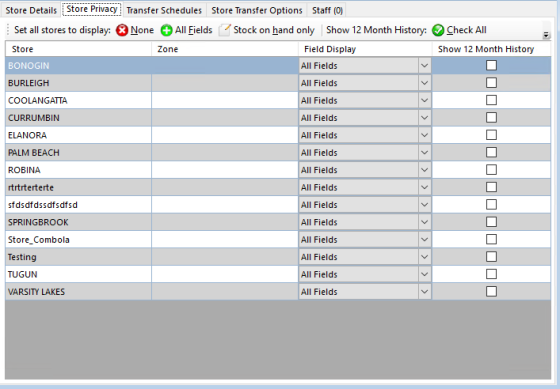
The Store Privacy tab enables you to show or hide Stock Card information between pharmacies. You can share card options such as: hide fields, show all fields and show stock on hand only. You can also enable the 12 Month History report of the Stores.
To add the Store privacy details:
1. On the Stores Privacy tab, select one of the following option from the Field Display drop-down list:
- None: Select this option to hide Stock Card information from display.
- Stock on hand only: Select this option to show only the stock on hand (SOH) information.
- All Fields: Select this option to show the fields described in the table below.
NOTE
If you wish to set all Stores to one of these three options, you can use Set all Stores to display options at the top of the Store Privacy.
| Option | Description |
|---|---|
| Store Name | The name of the Store. |
| Zone | The name of the Zone associated to the Store. |
| Last Buy Price | The last buy price of the Product (real cost).
This is the dollar amount paid (individually for each item) last time an Order was bought from the Supplier. |
| Average Cost | The average cost as shown in the LOTS Stock Cards and is calculated from purchases. |
| Average Retail | The average retail selling price of the Product. |
| Current Retail | The current retail selling price of the Product. |
| SOH | The current Product’s stock on hand. |
| MTD | The number of sales from the beginning of the month to the current date. |
| Expected Sales | The amount of expected sales for the month. |
| On Order | The number of units that is currently on Order. |
| Last Stock Take | The date when the stock was last counted. |
| Last Sold | The date when the Product was last sold. |
| Last Order | The date when the last Order was placed. |
2. Select Show 12 Month History check box to view the past 12 month’s history of individual Stock Cards in a bar graph format.
OR
Select the Check All or Un-Check All options to view all the Store past 12 months history.
3. Select Save Changes to save the changes.
The Store privacy details is saved, and you can move on to the Transfer Schedules tab.
Setting Transfer Schedules
The Transfer Schedule tab enables you to set up various scheduled jobs for the Store.
NOTE
All Store schedules must be set up in the Transfer menu before they appear in this tab. For more information, refer to Adding Schedules.
![]()
To set the transfer schedule:
1. On the Transfer Schedule, select Add Schedule.
The Add Schedule dialogue is displayed.
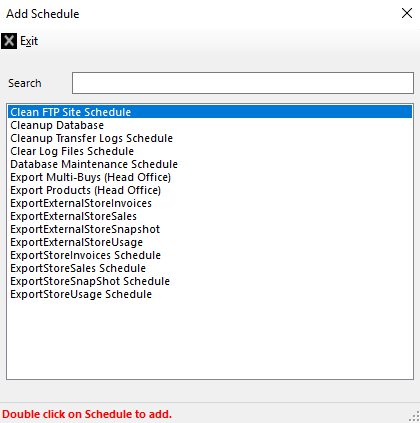
2. From the schedule list, double-click on the schedule you wish to set.
The schedule will appear on the Transfer Schedule tab and the following fields will be displayed.
- Job Name: The name of the job.
- Job Type: The type of job.
- Description: The description of the job.
- Trigger Date Time: The time and date when the job will be triggered next.
- Modified By: The ID of the person who has added the job.
- Modified Date: The date and time when the schedule was added or last modified.
After you have set up the transfer schedules, you can move on to the Store Transfer Options tab.
Configuring Store Transfer Options
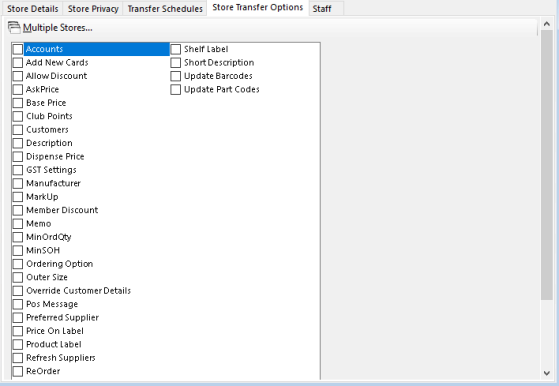
The Store Transfer Options tab specifies what information is to be transferred from RPM to a LOTS Store. The Store can receive information ranging from new barcodes to POS messages to new retail prices and more.
To configure Store transfer options:
On the Transfer Options tab, select the appropriate option from the list.
The following table lists what each transfer option does:
| Option | Description |
|---|---|
| Accounts | sIf selected, updates the centralised accounts of the Store.
NOTE LOTS Store level accounts will be disabled if this option is selected. |
| Add New Cards | If selected, transfers new Stock Cards into LOTS Stock Cards. |
| Allow Discount | If selected, updates the Allow Discount stock flag for all the products. |
| Ask Price | If selected, updates the Ask Price stock flag for all the products. |
| Base Price | If selected, updates the list cost for all the products. |
| Club Points | If selected, updates each product’s club points. |
| Customers | If selected, updates the customer details. |
| Description | If selected, updates the Product descriptions for all the products. |
| GST Settings | If selected, updates the GST pricing for all the products. |
| Manufacturer | If selected, updates the manufacturer field for all the products. |
| MarkUp | If selected, updates the Markup % on List Cost for all the products. |
| Member Discount | If selected, updates the Product member discounts to Stores. |
| Memo | If selected, updates the Product detail memo to Stores as a LOTS Stock Card comment. |
| MinOrdQty | If selected, updates the Minimum Order Quantity for all the products. |
| MinSOH | If selected, updates the Minimum Stock On Hand for all the products. |
| Ordering Option | If selected, updates the ordering options for all the products. |
| Outer Size | If selected, updates the Product’s outer size for all the products. |
| POS Message | If selected, updates the POS Messages for all the products. |
| Preferred Supplier | If selected, LOTS supplier details will be updated to match RPM for all RPM connected products. |
| Price On Label | If selected, updates the Price on Label stock flag for all the products. |
| Product Label | If selected, updates the Goods Label stock flag for all the products. |
| Refresh Suppliers | If selected, LOTS Supplier details will be updated to match RPM for all RPM connected products. |
| Re-Order | If selected, updates the Re-Order stock flag for all the products. |
| Retail | If selected, updates the Retail Price Including GST field for all the products in LOTS Stock Cards. |
| Seasonal | If selected, updates the season stock flag for all the products. |
| Shelf Label | If selected, updates the Shelf Label stock flag for all the products. |
| Short Description | If selected, updates the short description of all the products |
| Update Barcodes | If selected, this will update the barcodes for all the products. |
| Update Part Codes | If selected, updates the part codes for all the products. |
Viewing Staff Details
The Staff tab displays all the staff members that have been setup at the selected Store. When a Store first performs a data transfer all Store staff will be imported into this tab.
This tab displays the Staff Initial, Staff Name, Inactive and Security Level information. When a staff member is deleted from a branch they will be listed as Inactive in this tab.
