
The Details tab in the Customer Details screen lets you define the general details of the Customers such as customer’s name, address, family members, club points and membership type.
To add or edit the general details:
1. In the RPM menu, click Customers and then click All Customers.
The All Customers screen is displayed.
2. Do one of the following:
- To add a new customer, select New Customer.
- To modify an existing customer, select the customer and then select Edit.
The Details tab is displayed.
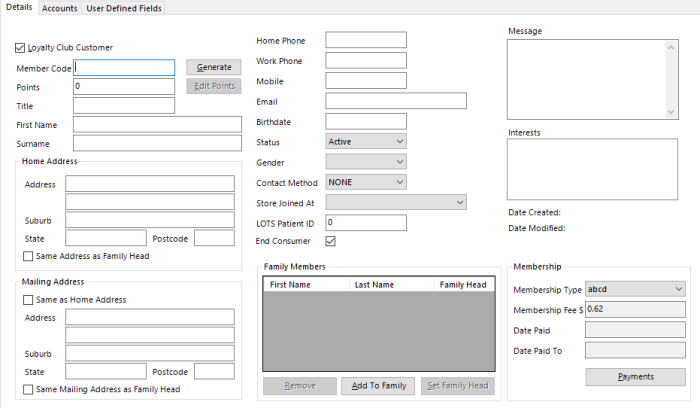
3. Enter the following information.
| Fields | Descriptions |
|---|---|
| Loyalty Club Customer | This option allows assigning the customer as a Loyalty Club Customer.
By default, this check box is enabled and it enables the Points, Family Members and Membership sections by default. |
| Member Code | The unique code of the Customer.
Select Generate to automatically generate the member code or you can manually enter the member code. TIP It is recommended to generate the member code instead of entering manually. The member code width is predefined in the Options menu. For more information, refer Options. |
| Points | The Loyalty Customers are part of Loyalty schemes where they can earn club points based on the purchase and these points can be accumulated for store rewards.
You can adjust the club points using Edit Points. For more information, refer to Adjust Club Points. |
| Title | The courtesy title of the customer. |
| First Name | The first name of the customer. |
| Surname | The surname of the customer. |
| Home Address | The home address of the customer such as Address, Suburb, State Postcode and an option to mark the address as the “Same Mailing Address as Family Head”. |
| Mailing Address | The mailing address of the customer, it can be same as home address or address as family head. |
| Home Phone | The phone number of customer’s home. |
| Work Phone | The phone number of customer’s work place. |
| Mobile | The mobile number of the customer. |
| The email address of the customer. | |
| Birthdate | The birthdate of the customer. |
| Status | The status of the customer whether Active, Deceased, Inactive or Pre-Active. |
| Gender | The gender of the customer whether Male or Female. |
| Contact Method | The contact method preferred by the customer, whether Email, SMS or Mail. |
| Store Joined At | The name of the Store, if any, the customer is linked to. |
| LOTS Patient ID | The LOTS patient ID is assigned to the customer when they first joined a Store. If this field is left blank, then a duplicate customer is created, assuming the patient already exists in LOTS Dispense . |
| End Consumer | The end consumer is selected by default. |
| Family Members | The Family Member section enables you to allocate all the family members together for the Loyalty Customers.
You can add the family members using Add Family. For more information, refer to Adding or Editing Family Members. |
| Message | The message text box enables you to type a message about the customer. |
| Interests | The Interests field enables you to add the customer’s interest.
You can add interests of the customers using Interest section. For more information, refer to Adding or Editing Customer Interest. |
| Date Created | The date the customer details are created. |
| Date Modified | The date the customer details are last modified. |
| Membership | The Membership section enables you to add membership details, if applicable. For more information, refer to Membership Type. |
4. Select OK to save the changes and exit.
The customer general details is saved.
If you wish to assign an Account to the Customer for Consolidated Debtors, you can move to the Accounts tab.