
The pricing options are populated from the Zone level to the Product level. You can modify the pricing options of the Product as per your requirement. This topic talks about the various tabs available to modify Product level information.
Once the Product information is modified you can apply these settings to multiple zones to save time. For more information, refer to Updating Multiple Zones.
TIP
Where possible, we recommend using Zones and Department/Sub Department options to manage pricing. This approach minimises the micromanaging at Product level and has the added advantage of affecting a large number of products in a single action.
Product level changes should be tracked and monitored regularly using tools such as Tagged Groups.
Modifying Product Settings
The Settings tab lets you set up pricing for each Product. Some settings are predefined based on specific zones, options or suppliers.
IMPORTANT
If you make any changes in the Settings tab, it will be implemented only for the selected Product.
To modify the Product settings:
1. In the RPM menu, click Defaults and then click Products.
2. Search for the Product you want to edit and then select it to edit its settings.
3. Product related information will be displayed on the Settings tab. A ‘Discontinued’ message will appear, if the selected Product is discontinued.
Modify the following fields appropriately:
| Option | Description | ||
|---|---|---|---|
| Pricing | The pricing policy that will be implemented for the Zone.
The options in the drop-down list are populated from the Pricing Policy menu under Options. For more information, refer to Pricing Setup. |
||
| Rounding | The rounding rule that will be implemented for the Zone.
The options in the drop-down list are populated from the Rounding SetUp menu under Options. For more information, refer to Rounding Setup. |
||
| Pricing Supplier | The Supplier that determines the Product list/base pricing.
The options in the drop-down list are populated based on suppliers supplying the selected Product. For more information, refer to Suppliers Details. |
||
| Preferred Supplier | The preferred Supplier for the Zone.
The options in the drop-down list are populated based on suppliers supplying the selected Product. For more information, refer to Suppliers Details. |
||
| POS Message | The desired POS message that will appear on the register when the Product is sold. | ||
| Club Points | The amount of club points allocated per dollar when the Product is sold in the Zone. | ||
| Discount ($ or %) | The amount or percentage of discount applied to the Product. This discount will be applied via LOTS POS.
|
||
| Markup% | The percentage mark-up used to obtain the retail price for the selected Zone. | ||
| Fixed Retail $ | The fixed retail value in dollars. This field will be implemented only if the pricing policy is set to the Fixed Retail. | ||
| Retail Price $ | The retail price in dollars. This field will be implemented only if the pricing policy is set to the Retail Price. | ||
| Current Retail $ | The retail price currently used at the Store level.
NOTE Exceptions and Deal Pricing can supersede the Product level retail price. |
||
| Min Stock on Hand | The minimum stock level held by Stores within the selected Zone. This information will be sent to Stores assisting in the ordering process. | ||
| Min Order Qty | The minimum Order quantity when ordering from the preferred Supplier. | ||
| GST % (Buy/Sell) | The Goods and Services Tax applied to buy and sell the Product. This field is non-editable. | ||
| Ask Price | This option will enable the sales person to enter a price when selling the Product. This is often used for products like gift lines. | ||
| Product Label | This option will enable the sales person to print a Product label for every new Product received in a delivery. | ||
| Shelf Label | This option will enable the sales person to print a new shelf label when the Product’s price changes, if the Product is active. | ||
| Price on Label | This option will enable the sales person to print the price of the Product on the Product Label. | ||
| Update Prices | This option defines if the retail price will be updated for the Product. | ||
| Seasonal | This option defines if the Product sales are impacted by the season. The setting will influence the Order quantity when generating an Order via LOTS Orders | ||
| Re Order | This option will enable the sales person to continue ordering the Product. If a specific Product is discontinued, you can deselect this option. | ||
| Discount Allowed | This option defines whether a discount can be applied to this Product at the register. | ||
| Active | This option defines if the Product is managed and therefore sent to the Store(s). If a Product is not ‘active’ (not selected) it will not be sent to the Store(s). |
4. After making changes, you can move on to the Zones tab.
Viewing the Zone DetailsOpen
The view only Zones tab lets you see the similarities or differences between zones.

Viewing the Store Details
The Stores tab lets you see the similarities or differences between Stores based on pricing, sales and ordering fields. Only the Stores that have sales history for the selected Product will be displayed. You can sort by column by clicking on the column heading.

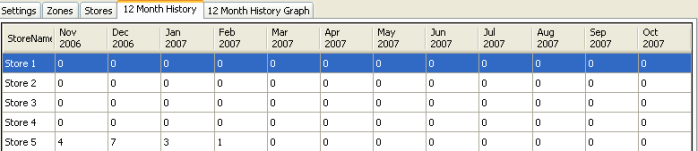
Viewing the 12 Month History Details
The view only 12 Month History tab displays the sales figures of the Product sold by each Store. The sales figures are in single units and are shown per month for the past 12 months. You can sort by column by clicking on the column heading.
Viewing the 12 Month History Graph DetailsOpen
The view only 12 Month History Graph tab displays the quantity of the products sold by each Store. The graph is displayed in units and is shown per month for the past 12 months. Stores are only included in the graph if they have a sales history for that Product in the past 12 months.

Adding an ImageOpen
The Image tab lets you add an image to a Product. When a data transfer occurs from RPM to a Store, all the images will be saved to the Item Image section in the LOTS Stock Cards. These images will only be shown at LOTS branches that are using a customer display screen.
NOTE
Currently, RPM supports only jpeg (.jpg) or bitmap (.bmp) image formats. We recommend you add images in the .jpg format.
To add an image:
- On the Image tab, choose Select Image.
- Locate the image file you wish to add to the Product and select OK. The selected image is displayed in the Image tab.
- If you wish to remove an image, select Remove Image.
- You will be prompted with the confirmation message, select Yes. After adding the required information in the above tabs, select Save Changes to apply the necessary changes.