
In CCD, use Organisers to carry out management activities on records. Organisers are available for Scripts, Patients, Prescribers, Drugs, Staff, and Medical Institutions.
Using the organisers you can:
- Find and browse records
- Select single or multiple records
- Perform actions such as editing and deactivating
- Save sets of records for later use, i.e. selections
- Run related reports.
To open an Organiser:
- From the menu bar, choose the menu option you want.
- Choose the Organiser you want to display.
Using Organisers
Organisers consist of the following:

Search Row
The search row boxes correspond to the columns in the record list. Use the search row to find a specific record, or to find groups of records with particular characteristics.
For Example:
In the search field, type in the first letter of the patient’s surname followed by a space and then the first letter of the patient’s name, CCD will then display all the patient’s whose surname and first names match the letters that you entered.
As you type, the record list updates to show only the matching records. The closest match is highlighted.
NOTE
The search rows are not case-sensitive. This means that you can use either upper or lower case letters to find records.
Record List
The record list is divided into columns of related information. Use these columns to find a specific record or a group of related records.
Organisers with many records (such as the Patient Organiser) require you to type something into the search row before any records are displayed. You can then view the contents of the record list by:
- Clicking on the scroll bar to move up or down. Then click on the record that you want to view.
- Pressing Up Arrow / Down Arrow or Page Up / Page Down on the keyboard.
Searching Records
To search for a specific record, you can:
- Use the search row to quickly display records with specific characteristics (e.g., surname Brown, given name Lucy).
- Click on the scroll bar to move up or down the contents of the record list.
- Press Up Arrow / Down Arrow or Page Up / Page Down on the keyboard to browse the record list.
To find a group of related records, use the search row boxes to enter your search criteria (e.g., drug brand/manufacturer, patient, medical institution, doctor suburb). Only the matching records will be shown.
TIP
Tick the Active Only check box to see only active patient records. This checkbox is only available in the Patient Organiser.
Tick the Sounds Like check box when unsure of spelling or punctuation to find records based on sound.
Click Searching to read more information.
Sorting Records
Records in Organisers can be sorted into ascending (e.g. A-Z) or descending (e.g. Z-A) order. They are initially displayed in the most frequently used order, but you can sort them differently if you want.
For Example:
Records in the Drug Organiser are normally sorted by name, form, strength and quantity. If you want to see the records arranged by manufacturer, sort by the Br (brand) column.
When you choose a column to sort by, appropriate secondary sort columns are automatically used.
For example,
When you sort the Drug Organiser by the Br (brand) column, records are first sorted by brand, then by name, form, strength and quantity.
You can set the sort order using the keyboard or the mouse.
To sort records in an Organiser using the keyboard:
-
From the menu bar, choose Options → Sort. Then choose the column you want to sort by.
To sort records in an Organiser using the mouse:
-
Click on the column heading.
The mouse pointer changes to ![]() when it is over a column heading that cannot be used for sorting.
when it is over a column heading that cannot be used for sorting.
Successively selecting the same sort column switches between ascending and descending order.
Column Widths
To change the width of a column:
- In the column heading row, position the mouse pointer over the column divider line.
The mouse pointer changes to ![]() .
.
- Drag the line to the required position.
There is no keyboard equivalent for this action.
Buttons
The table below lists the buttons in the Organisers and describes their use.
| Button | Description |
|---|---|
| Add | Creates a new record. A blank Details screen is displayed. |
| Edit | Opens a Details screen with the selected record’s information. |
| Deactivate | Deactivates the record. When a record is deactivated, it cannot be used for dispensing purposes. |
| More | Displays a menu with additional actions depending on the selected organiser. |
Performing Actions on Records
Use the buttons at the top of the record list to perform actions such as editing, and deactivating records.
The Actions menu displays a list of commands for working with records already in the Organiser.
To use the Actions commands, do one of the following:
- Right-click on a record in the record list.
- Select a record and then press F2.
Adding Records
To add a new record:
- From the Organiser, choose Add.
A blank Details screen is displayed.
- Enter the new record’s information.
- Choose OK.
Editing Records
To edit the details of a record:
- Select the record in the Organiser, then choose Edit.
The Details screen is displayed.
- Make the required changes.
- Choose OK.
Deactivating and Reactivating Records
To deactivate a record:
-
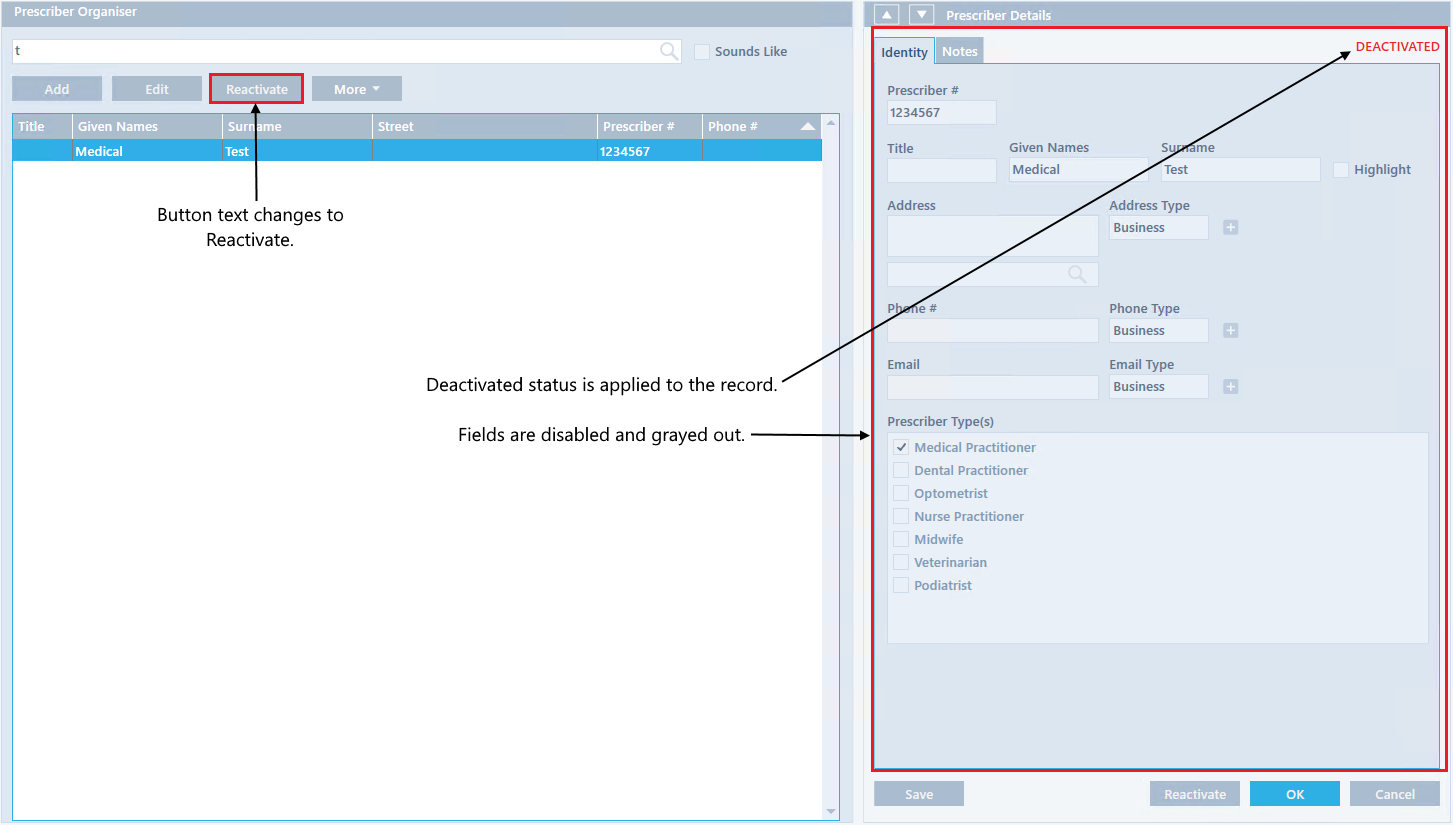
Select the record in the Organiser, then choose Deactivate.
The record is deactivated and the button text changes to Reactivate. All the fields in the details screen are disabled and the Deactivated status is applied to the record.
NOTE
Deactivated records cannot be used for new transactions and cannot be modified. Their information is retained for reporting, auditing and other purposes, and they can be reactivated if required.
For example,
If you deactivate a patient, their prescription history cannot be added to or modified, and you cannot change their details.
If you deactivate a doctor, they cannot be used for new prescriptions. However, they can be used for dispensing any remaining repeats of prescriptions already entered into your Corum Clear Dispense system.
Deactivated records are shown in grey text in Organisers. They do not appear at all in drop‑down lists.
To reactivate a record:
- Select the record in the Organiser.
- Do one of the following:
- Choose Actions → Reactivate.
- Click the Deactivate/Reactivate buttons.
You can also deactivate and reactivate records using the Deactivate/Reactivate buttons on the Details screens.
Highlighting Records
Highlight records to make it easier to pick them out in drop‑down lists and Organisers.
For example,
You might highlight:
- Drugs you dispense frequently
- Your preferred brands of particular generic drugs
- Patients you dispense to frequently
- Doctors in your local area.
To set highlighting for a record:
- Select the record in the Organiser.
- Choose Actions → Highlight or Actions → Remove Highlighting.
You can also set record highlighting from:
- Drop‑down lists
- Details screens