
This topic describes how you can dispense an original or new script. If you are already familiar with the dispensing process follow the quick steps for entering prescription details to dispense an original script.
If you are dispensing a script for the first time in CCD, refer to the Detailed Instructions to get familiar with the process.
TIP
To make things easy many of the options are selected by default. All you need to do is use the navigation keys to quickly move to the items of interest.
Entering Prescription Details
Quick-Steps
To dispense an original script, follow the quick steps below:
 |
|
NOTE
For further information about specific fields in the Dispense panel refer to the Detailed Instructions below or look up the field descriptions from the Dispense Pane
Detailed Instructions
For more detailed description of the dispensing workflow, refer to the steps below:
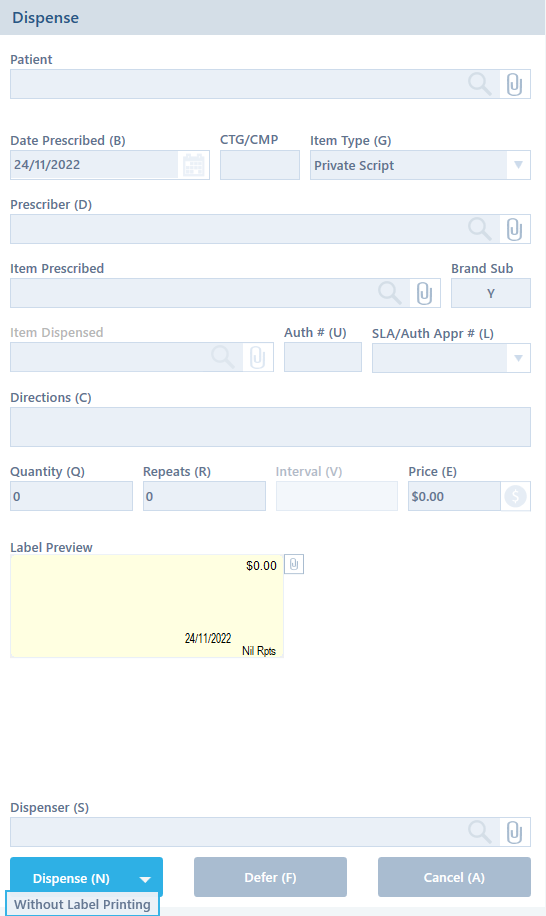
- In the Patient field enter the name of the patient.
As you type in the name, results matching your search entry are displayed. From the list, select the patient. On selecting the patient, the patient’s address is displayed below the patient name, for easy reference.
If the patient search does not display the required result, select Add New and proceed with adding the new patient’s records.
a. The Script Date is set to today’s date to reflect the date on which the script is being dispensed. If the script is an Owing Script, it will not show a date of prescribing, enter the letter O to indicate an Owing script. Clearing the text in the date control also accomplishes the same thing.
b. The CTG/CMP field is active and its value is displayed only when the patient is registered for CTG. If not, the field appears inactive.
c. The Item Type menu will default to what has been previously set for the patient. It could be any one of the following categories – Private Script, PBS Private Script, PBS Script, RPBS Script, Prescriber Bag Supply, S3 Recordable Supply, Continued Dispensing, Other Recordable Supply, etc. Choose a different category, if processing a different type.
d. The Prescriber field displays the previously set prescriber for the patient. You can look for a different prescriber by entering the name or prescriber number in the search field or add a new prescriber to the list.
2. In the Item Prescribed field, enter the name of the item as displayed on the script.
The search results display all details relevant to the drug, such as the available brands, strength, form, and price. Check for the brand / name / chemical composition and dosage from the script and make your selection. The drug search results can appear as either grouped or ungrouped. Refer to the Item Prescribed section, for more information.
a. The Brand Sub field displays Y, if brand substitutions are permitted for the patient. If not, the field will display N.
3. In the Item Dispensed field, enter the name of the item being dispensed.
If the drug being dispensed is of a different brand, ensure required conditions for dispensing the drug are met. Refer to the Item Dispensed section for more information.
a. The Authority # field is active if the drug requires an authority number.
b. The SLA / Auth Approv # menu becomes active only when an authority number is entered. Choose a suitable entry from the drop-down menu for streamlined authority items.
4. In the Directions field, enter drug-related instructions for the patient’s reference.
This information can be viewed immediately in the Label Preview. You can also quickly add directions by selecting specific keys.
For Example
If you enter ‘1’, the Label Preview will display ‘Take one tablet a day.’
5. In the Quantity field, enter the quantity supplied.
The quantity can be specified as either a whole number or decimal value, e.g. 20 or 20.50. The recommended maximum dosage for PBS drugs is visible below the Quantity field.
a. In the Repeats field, enter the number of repeats prescribed. To add a dispensed repeat value, enter a forward slash ( / ) after the repeats prescribed and then enter the number of times the script has been dispensed.
In addition to the numbers of repeats you can also include the following characters to represent the category of script, U (for unoriginal), R (for Reg24), D (for defer), and O (for owing).
For Example
If you enter 3 U/1 or 3/1U, it implies that 3 is the number of repeats prescribed for the unoriginal (U) script and 1 is the number of times the script has been dispensed. The recommended maximum number of repeats for PBS drugs is visible below the Repeats field.
NOTE
When dispensing Owing Scripts or PBS / RPBS drugs, refer to the Repeats section for more information.
b. The Interval field is active only if duration between repeats is specified by the prescriber. It is the number of days that need to elapse between repeats, before which a patient is not allowed to purchase the specific drug from the pharmacy. If there is no such requirement the field is inactive.
c. The Patient Price provides you with the dollar value for the selected drug. The dispenser can revise the price in special circumstances, when needed.
d. The dollar sign $ beside the patient price can be used to access the pricing details for the selected drug. You can use this space to override specific pricing parameters (e.g. specify mark-ups, fees, discounts, etc. to calculate new and overall patient prices).
6. The Label Preview displays the name of the item dispensed and the item prescribed (if different), its dosage and price, directions of use, name of the patient and prescriber, date prescribed and the number of repeats (if any).
7. Click the paper clip icon located at the right of the label preview. The paper clip icon will be white if there are no notes yet, or blue if there are notes.
The Add Script Note screen is displayed. This screen operates like the Notes tab of the Script Details screen.
8. Click the + icon to insert a note, then type the details required.
9. Choose OK to return to the Dispense screen.
The newly entered note will be displayed in the Alerts panel.

10. The Dispenser field must display the name of the person responsible for dispensing the script. Enter your name in the search field.
11. Choose Dispense to complete the script. The docket and labels will be printed (as previously set).
NOTE
a. On dispensing a script, the Print screen is displayed. Select any additional items that you wish to print.
b. Choose Defer if you wish to dispense the item later. You can defer only original script items and not repeats.
c. Choose Cancel if you do not wish to dispense the script.
d. Select the arrow and choose Without Label Printing if you want to dispense the script without printing labels.
e. Look up the Patient History to view the dispensed and deferred scripts.