
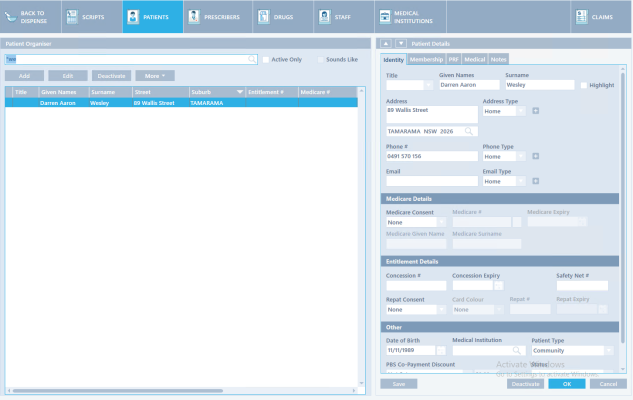
Use the Patient Organiser to:
-
Browse the patients in your Clear Dispense system.
-
Perform patient actions such as adding, editing, deactivating, and highlighting.
These actions can also be performed from the Dispensing screen. However, if you are focusing on patient maintenance rather than dispensing, it is more efficient to use the Organiser.
-
Merge patients’ dispensing history or details.
-
Print patient‑oriented reports.
These reports can also be printed from the Dispensing screen.
-
Manage saved patient selections.
Opening the Patient Organiser
To open the Patient Organiser, from the menu bar, choose Patient → Patient Organiser.
The table below lists which columns you can use to filter and which can be sorted.
| Column | Text Filter | Sound Filter | Sort |
|---|---|---|---|
| Title | Yes | Yes | Yes |
| Given Names | Yes | Yes | Yes |
| Surname | Yes | Yes | Yes |
| Street | Yes | Yes | |
| Suburb | Yes | Yes | |
| Entitlement # | Yes | Yes | |
| Medicare # | Yes | Yes | |
| Phone # | No | No | |
| No | No | ||
| Med Inst | No | No | |
| Family | Yes | Yes |
When the Patient Organiser is first opened, the record list is empty. To display records, type something in the search row.
Buttons
The following table lists the buttons in the Patient Organiser and describes their use.
| Button | Description |
|---|---|
| Add | Displays a blank Details screen so that a new patient can be added. |
| Edit | Displays the selected patient’s details so that they can be edited. |
| Deactivate | Deactivates the selected patient so that they do not appear in drop‑down lists and cannot be modified. |
| More | Displays a list of commands for working with patient records. |
The following table lists the Actions button commands and describes their use.
| Button | Description |
|---|---|
| Highlight | Highlights the selected patient in drop‑down lists and the Patient Organiser. |
| Merge | Merges the dispensing history or details of two patients. For details, see Merging Patients. |
| PRF | Prints a PRF report for the selected patient. For details on this report, see Prescription Record Form. |
| Remove Highlighting | Removes highlighting from the selected patient. |
| Print Address Label | Prints the address label for the selected patient. |
Merging Patients
Sometimes patients are recorded on your dispensing system several times, for instance under slightly different names or at different addresses.
To merge the dispensing history or patient details from one patient with another:
1. From the Patient Organiser, choose More → Merge.
The Merge Patients screen is displayed.
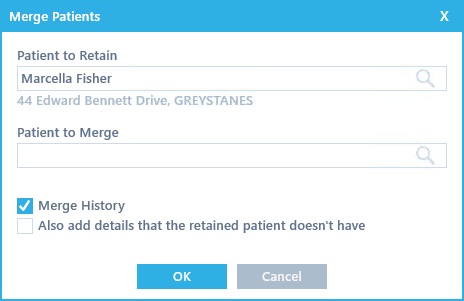
2. In the Patient to Retain field, search for and select the patient that you want to keep in CCD.
3. In the Patient to Merge field, select the patient whose history or details are to be merged with the main patient’s.
4. To merge the second patient’s dispensing history with the main patient’s, tick the Merge History check box.
5. To merge the second patient’s details that the main patient may not have, tick the Also add details that the retained patient doesn’t have check box.
With this option, details are only merged if they are not already present in the main patient’s details.
6. Choose OK. The selected information is merged into the main patient and the second patient is deleted from your dispensing system.
A confirmation message is shown to indicate that the selected patient’s have been merged.
NOTE
If you choose Merge with a patient selected in the record list, that patient is automatically selected as the main patient.